
Quick Tips
Camera Raw
Be sure you have the most up-to-date plug-in to open your Camera Raw files in Adobe Photoshop CS5. Adobe frequently updates the plug-ins to support more and more cameras. Download the latest Camera Raw plug-in for Mac or Windows. Unfortunately, Adobe's latest plug-in does not work with older versions of Photoshop, including CS4.
JPEG
Every time you open, edit and save a JPEG file, you invoke the compression technology and image degradation occurs. Edit your photos in a format that is not lossy such as TIFF, BMP or PNG to keep the quality of the original JPEG intact. Read JPEG myths and facts.
Tips, Tricks & Tutorials
PHOTOSHOP
High Dynamic Range (HDR)
HDR is a utility in Photoshop that allows you to combine several photos into one stunning image! Combining several photos into one captures a greater range of detail than any camera can ever capture in a single image.
Below is an example that demonstrates how the same scene at Tunnel Park in Holland was shot at different exposures to produce one spectacular image. After the example, there are a list of tips to help you shoot photos that will work well for HDR. Finally, at the bottom of this web page, are directions on how to use HDR in Photoshop to merge your photos into a single image that captures the best of each image.
Example:
|
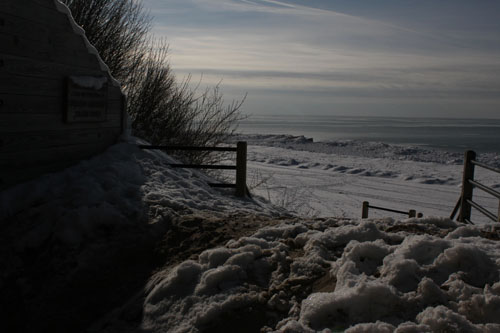
Image is underexposed, therefore very dark. Notice the detailed highlights in the sky are captured, but the detail in the foreground shadows are lost. |
|
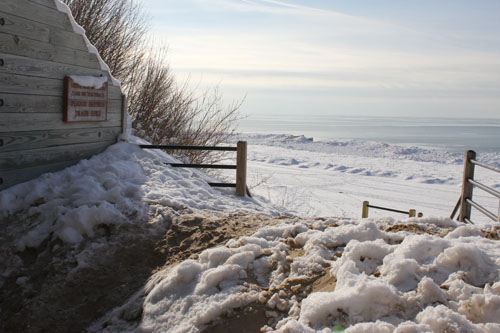
At normal exposure, more light has been used to capture the image. The foreground contains greater shadow detail, but this came at the price of losing the highlight detail in the sky. |
|
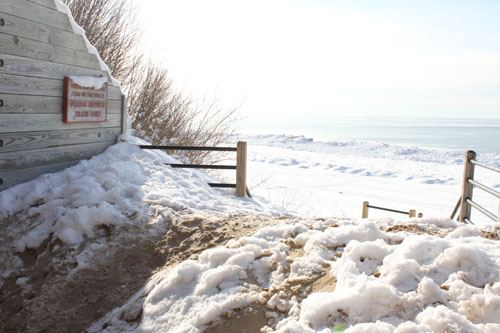
Even more light has been used to capture the now overexposed image. All the shadow detail in the foreground has now been captured, but all the highlights detail in the sky are completely lost. |
The camera was not able to capture a single image that shows the highlight details in the sky, the shadow detail in the foreground along with the mid range detail. Solution? Use Photoshop's HDR utility to combine the best of each photograph into one.
|
|
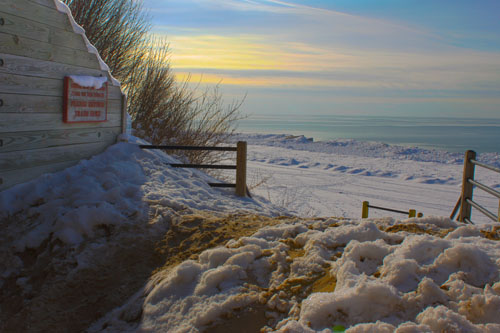 |
HDR was used to merge the three above photos. Highlight detail in the sky has been captured along with shadow detail in the foreground. The normal exposure captured all the midrange details.*
*Note: saturation was increased in the final image to add coloring in the sky. |
Shooting Tips for HDR:
- Use a tripod to keep your camera steady, especially when the shutter is left open longer to let in more light.
- Vary the shutter speed to control how much light is used to create the photo (to produce underexposed, normal and overexposed). Notice the different exposure times in the photos above.
- Don't change the aperture as it will only complicate using HDR. Notice the apeture (f-stop) is 19 in all the photos above. The higher the apeture f-number, the greater the depth of field and the sharper the picture will look in the background. I wanted to be sure the sky, water and beach in the background were crisp, therefore I was careful to not use too low of an f-number.
- Don't use a flash for one exposure and not another.
How to Create an HDR Photo in Photoshop:
- After Photoshop is open, click File, point to Automate, then click Merge to HDR Pro.
- Click Browse.
- Navigate to where your photos are located.
- Select the photos you wish to merge. You may use the Ctrl key to select more than one photo at at time.
- Click Open.
- Click OK.
- Photoshop begins to create the single HDR image from the multiple photos. This process may take several seconds. After the process is complete, the Merge to HDR Pro dialog box will open.
- In the dialog box, check the Mode list arrow on the upper-right to be sure it is set to 16-bit. The higher this number the more computer memory allocated to each pixel along with a greater range of detail and tonal range in the HDR composite. A higher number will also increase the file size. 16 bit is a good number to satisfy most people without creating an enormous file size.
- Clck the OK button, located on the lower-right, to execute the HDR merge.