Quick Tip
 The Photoshop CS6 new dark interface can quickly be adjusted with two keyboard shortcuts. Shift+F2 to incrementally lighten and Shift+F1 to incrementally darken (For Mac users, you may need to use the function key too Shift+Fn+F2 or F1).
Tips, Tricks & Tutorials
PHOTOSHOP
Photo into a Sketch
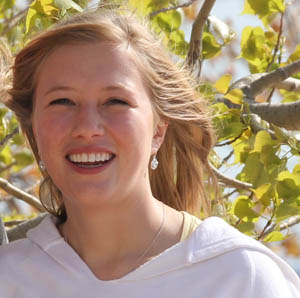
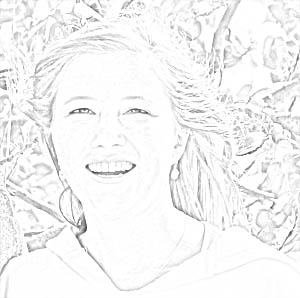
Below is the before and after. The left side is the original photo and the right is after the contrast, filter, and blend mode are applied.
- The first step to creating a good sketch is be sure the photo has good contrast levels.
- I added a brightness/contrast adjustment layer to improve, even exagerate, the shadows and highlights in the photo. Click Layer > New Adjustment Layer > Brightness/Contrast to add a non-destructive adjustment layer. Adjust the sliders for a good contrast.
- Next, on the image layer (not adjustment layer), use Overlay blend mode to add additional contrast. Painting in Overlay is like painting with sunlight! This is a common technique to improve photographs.
- To increase the contrast and brighten the eyes, I used a small brush, white foreground color, Overlay blend mode at 50% opacity and painted the iris (color part) of the eyes.
- Next, I used an even smaller brush, black as the foreground color, Overlay blend mode again, 50% opacity and painted around the iris on the black edge to make the eyes pop even more.
- After there is good contrast in the image, desaturate the image layer. Be sure the image layer is selected.
Click Layer > New Adjustment Layer > Hue / Saturation. Click OK and drag the Saturation slider all the way to the left until the image looks gray scale. - Click the original image layer to select it and then press Ctrl+J to duplicate the layer.
- Select the duplicate layer and invert it. Click Image > Adjustments > Invert. Your photo should now look like a film negative.
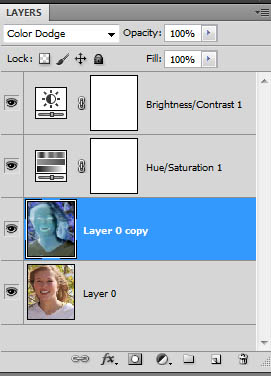
- With the duplicated, inverted layer selected, change the blending mode on the layer to Color Dodge. Click the drop-down menu located in the upper-left of the Layers palette and choose Color Dodge. The entire layer will turn completely white.
- Finally, use Gaussian blur to make the image look like a sketch. With the same layer (looks completely white) still selected, click Filter > Blur > Gaussian blur. Adjust the Radius slider somewhere between 4.0 and 9.0 until your photo looks like a sketch. Click OK. After your work is complete, your photo should look like a sketch and Layers palette as follows: