
Quick Tip
Photoshop blending modes  determine how the pixels in a layer are blended with underlying pixels on other layers. With 25 different modes, how can you know the results of using each without clicking the drop-down menu numerous times? To easily experiment and cycle through the modes on your layer, click the blend modes in the top-left of your layer palette to activate, and then use the up and down arrow keys on your keyboard to quickly see the results of each mode!
Tips, Tricks & Tutorials
PHOTOSHOP
Zoomify
The pixel dimension of the car shown below is 3800 wide x 2850 tall. It also had a file size of 1.5MB. Most people view Web pages at 1024 x 768, therefore the dimensions of the car photo is much too large. With a file size of 1.5 MB, the file size is also too large, especially for those with slower internet connections. A possible solution would be to reduce the size of the image considerably, but then all the detail is lost.
A better solution is to Zoomify the photo. Keep the detail, but reduce the dimensions and file size. Below is an example of a high-resolution jpg file that has been Zoomified. Use the buttons below the car to zoom in and see the extrodinary detail that you could not display easily on the Web without this feature. See additional examples at Foveon.
Here's How:
1. Open your high-resolution photo in Photoshop.
2. On the Application (or menu) bar at the top of the screen, click File > Export > Zoomify. The dialog box is shown below along with the settings I used to create the Zoomified car.
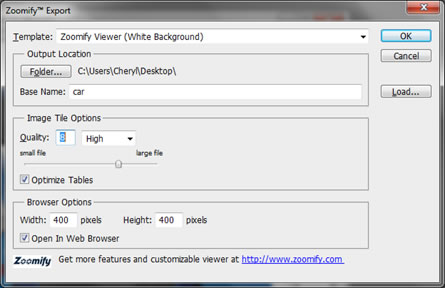
4. The Template option in the Zoomify Export dialog box gives you options for how you want the Zoomify Viewer to appear on the Web page. I choose a white background to coordinate with the rest of my site. When you click the drop-down menu for Template, you will also see options for Navigator. With a Navigator template, a small window appears in the top-left corner of the Zoomify Viewer, which is similar to the Navigator panel in Photoshop. The navigator comes in handy when your visitors are zoomed in close so they can tell what part of the photo they have zoomed.
5. After clicking the Folder button for the Output Location of the Zoomify Export dialog box, choose where you want to save your files. I saved my files to the Desktop to make them easy to locate. Files that will automatically be created include an html file, a Flash *.swf file, and several small jpg pieces of your original photo.
6. The quality of your photo depends on the Image Tile Options you choose. The lower the number, the smaller the file size, but the lower the quality of the image. For the car, I choose 8 to bring down the file size, but still preserve the quality of the photo. 12 is the best quality and largest file size.
7. You can specify how large you want the Zoomify Viewer to appear on the Web page. I went with the default of 400 x 400.
8. Click the Load button to generate the Zoomify files. After the files are created, copy them into your web site and upload to a server.